Showing posts with label recipe. Show all posts

Aug 7, 2013

☆ Filed under the TOP SECRETS ☆ Chocolate Chip Cookies

W E D N E S D A Y ,  A U G U S T  7

hello dear reader. Today I will share how to get the most of your chocolate chip cookies. I've had years of failing at baking these and with that much experience I've just recently cracked them. It's my favorite thing to make these days, it's actually quite embarassing how many times I've made them. Here they are, my tips & tricks on how to get the yummiest chocolate chip cookies!


Here's your simple 5-ingredient recipe, now onto the tips.

TIP 1: butter and egg must be room temperature
Just take them out of a fridge a few hours before you get to the baking.

TIP 2: do not over-mix your dough. Stop the second you see it's all fluffy and even. Use a spoon when mixing in the chocolate chips.

TIP 3: take the cookies out of the oven when they're slightly brown-ish on their edges. It takes about 15-20 minutes in the oven. (Have it pre-heated). 
Very important: cookies may seem undercooked, they actually a little bit are. But that way, they'll stay fluffy and soft on the inside, but crunchy on the outside!

TIP 4: to achieve what I've just mentioned, you'll need to place your cookies on the cooling rack. Keep them there for about 20 minutes.


Eating chocolate chip cookies without a glass of milk would be a crime! 

Hope this was helpful for someone out there who just like me struggled with these cookies. But I believe the majority of yous have already mastered the art of it, so can you please just be happy for me now that I can enjoy them too! I will probably be heading to the kitchen now... (I've already finished the cookies I made two days ago)

BISOUS BISOUS,
JULIA

Jun 26, 2013

RECIPE: The Easiest Iced Coffee Ever


This is something I can't go a single Summer day without. Seriously, I drink iced coffee  e v e r y  d a y.  And I make it in the easiest way possible. No, of course I don't simply put ice cubes in a regular coffee! But ice cubes are very much included, let's have a look.

Yeaaa, that's the secret. Freeze your coffee! 
Use coffee which is stronger than your regular. More coffee, less water.


4-6 cubes + a cup of milk = 1 serving
A scoop of vanilla ice-cream is optional, but it tastes better with it!

Blend away and you're done!

Now go freeze some coffee.

BISOUS BISOUS,
JULIA

Apr 23, 2013

Here's For The Pink Drinks

T U E S D A Y ,  A P R I L  2 3

HERE'S FOR THE PINK DRINKS

 I made a pink smoothie!! I realized it's going to be pink only when I started the blender, it instantly turned pink. Raspberries did the job, obviously. This is no special recipe post, or the one that requires following certain steps strictly, I'm only sharing the process of my smoothie. You just put whatever fruit or berries or yogurt you have on hand right now! Hope this little blog entry makes you do that. Life's too short for boring food.

Oh and of course there's my homemade granola, which can be found here!

If by any chance I made you hungry and you made a yogurt smoothie as well, share a picture of that joy in a glass! Tag me in your tweet or post a photo on instagram, my username on both is rosylayers. That would make my day, you know. Have a lovely one yourself!

BISOUS BISOUS,
JULIA

Apr 15, 2013

Recipe: GRANOLA!

M O N D A Y ,  A P R I L  1 5

MAKE YOUR OWN GRANOLA!

Have the yummiest glass of yogurt and granola parfait, with your own homemade granola! Another easy recipe I'm sharing with you guys. You should be able to find everything you need at home right this moment, since you can use anything you have on hand! If you don't like my combinations of nuts or seeds or dry fruit, you use whatever you like the best. Basically, play with whatever you have in your pantry, only with the right amounts. Now let's see how it's done!

And there you have it! Whenever you feel like having a snack, just grab some yogurt, fruit or berries & layer it all up in a glass! Now it may seem like a light snack, but personally, I find very filling. You know, I can hardly finish this glass! But believe me it's the yummiest. You can see there's no sugar in this recipe, that's because the honey does the job. I personally really don't like honey, but I was left very surprised how tasty it turned out! Honey just sweetens everything up, so no worries if you don't like this ingredient too. 

You may have missed some of my other recipes, why don't you catch up now!


Bon Appétit!
Julia

Apr 8, 2013

RECIPE: Basic Chocolate Muffins

M O N D A Y ,  A P R I L  8


Today I'm sharing a very easy recipe of chocolate muffins. No special ingredients, no certain cooking skills needed. I use this exact same batter either for brownies or muffins. You can also make a round shaped pie, cut it in a half and make those cake pads, then add some filling and you have a cake. 

What you're going to need:

200g dark chocolate
220g                 butter
5                           eggs
6tbsp                  flour
1tbsp  baking powder
100g                   sugar


And you're done here! As I said, these are very simple chocolate muffins which still taste so good, maybe because of the amount of chocolate, I'm guessing. I also like to add like 4-5 shots of espresso so it's like boom - chocolate! But that's optional. 
So this recipe is very versatile, a very basic one for a simple chocolate batter of which lots can be made! I've baked so much of this, I know the recipe by heart already, it's in me haha!

Here are some of my other yummy recipes in case you missed it:

> Hawaiian Pizza on Tortilla
> Healthy Breakfast Pie
Cocoa by me
My Favorite Lunch

Bon Appétit!
Julia

Feb 25, 2013

Delicious Discovery

M O N D A Y ,  F E B R U A R Y  2 5

DELICIOUS DISCOVERY

Stopping by for a really quick announcement, to share this delicious bake, a great discovery from Kirsty's blog.Words cannot describe how tasty it is, let alone how healthy! I'm baking it everyday since Friday because my mom keeps demanding haha! The first time I made it, she found it in a kitchen and then burst in my bedroom telling me to go and bake another one right that minute because as soon as she finishes that one, she'll want more. So yeah, you must try this out. The ingredients are very simple and not much is needed in general.


I have been yelling the steps of making this pie to my mom as I started writing this post. It's already in the oven, well done, mom. Now go make one yourself!

BISSOUS BISSOUS,
JULIA

Feb 22, 2013

Cocoa by Me

F R I D A Y ,  F E B R U A R Y  2 2 

COCOA BY ME

I'm about to share the way I make my cocoa which I made up months ago when I didn't want to drink the usual drink. It tastes heavenly and I can't go a day without a cup of it, and that's me talking, tea lover since the day 1. So that's saying something.

All you're going to need is a mix of cocoa drink of your choice, coffee and milk. And a cute mug of course.


Start off with 3 tablespoons of your cocoa mix.

Oh the joys of owning a coffee machine! If you have one, a shot of espresso is enough. And if you don't, then make some coffee beforehand and pour it onto cocoa while stirring (how adorable is my mini whisk ??). Stir until you get an even and smooth and oh so very delish concentrate of cocoa and coffee.

Milk is the last ingredient needed so fill up the whole mug.

Now that the milk made your drink cold, put it a microwave for a minute or bit longer.

Aaaand it is done!!
I love this drink so much I can't even drink a regular cocoa anymore. I made a cup of a regular one last night and it was ew, haha! Go ahead, try this out and tell me how it is.

BISSOUS BISSOUS,
JULIA

Feb 16, 2013

Recipe: FAVORITE LUNCH

S A T U R D A Y ,  F E B R U A R Y  16


A forever-ago-promised recipe is finally here! A recipe of my favorite lunch - rice and chicken. I wanted to share this for so long as I was enjoying this meal for way too long. And I still am. So delicious! 
So when I was about to go to the kitchen today, to make myself lunch, I brought a camera just as well. It was kind of weird and challenging at times to take pictures and try to cook at the same time. Is there such thing as a blogger assistant? No? Let's say I just invented the job and am waiting for your CVs. In all seriousness now, I'm here to share a step by step recipe!

I N G R E D I E N T S :

Rice (I use about half of the bowl. Put as much as you want, as much as you're planning to eat)
Peas (again, as much as you want. I usually pour about half the teacup of them)
1 egg

 S T E P  1


Beat an egg into the preheated and greased pan. You do not need it stiff! Make it into little bits using a spatula until it looks like in my photo.

S T E P  2

Add your rice and let it cook for several minutes. Then pour the peas, stirring the whole thing, let it cook for several minutes again. Don't forget to add a pinch (or several, depends on how you like it) of salt. And you're done here, time for chicken!

S T E P  3: c h i c k e n


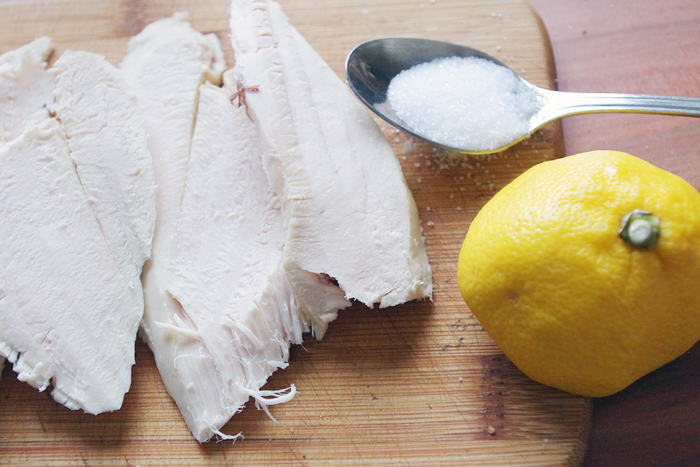
What you're going to need is a chicken breast (I slice it like that), a lemon and sugar.


Put the slices of chicken on a preheated and greased pan, while cooking squeeze some lemon on them. Each of those has to get some juice. 

S T E P  4

Sprinkle sugar on each slice. Not too much. I use less than a teaspoon for all the slices. Let it cook for a minute.

Flip over the slices and do the same, squeeze some lemon, sprinkle sugar, again, less than a teaspoon. So approximately you need 2 teaspoons of sugar for a whole meal. 

(if you didn't get it, you need lemon juice so that sugar would stick to the chicken)

Done with chicken!


Voilà!

The credits of cooking rice like that, goes to my aunt, she taught me this two years ago and I still eat it and love it. And credits for this sweetened chicken breast goes to me! I came up with it not very long time ago and I'm quite genius I dare to say, I love how it turns out.

I hope someone will try this and fingers crossed that person will like it!

Bon Appétit!
Julia